Report Preview shows a screen representation of printer output prior to actual printing. There are different options that are available in the preview screen based on the opened report, and where it was opened. Each preview window has a set of options across the top that are broken down by Print, Navigation, Zoom, View and Export.
There are two main types of report preview. The first of the two comes from when a user clicks on a Work Order Number hyperlink or Procedure Hyperlink to open it up. This gives the user a chance to see the work order and to continue on and open it in Work Order Viewer if they have the permissions. Refer to Open in Viewer/Open in History to read about the specific options for that Print Preview window.
A report in Report Center will also open up in Report Preview with a different set of options. In the preview, users have additional options categorized as Report Actions that allow reports to be customized with the ability to memorize a report.
Report Preview
Reports opened up from Report Center will give users a screen representation of the report with the data. Across the top, options are broken down by Print, Navigation, Zoom, View, Export, and Report Actions.

Report Preview (Click to Enlarge)
•Print: Prints the document based on the settings. Use (Ctrl+P) to shortcut this action. Clicking print will bring up a window with additional settings available.
•Quick Print: Quick print the document with default settings to the default printer.
•Page Setup: Adjust the documents page settings. This window will adjust the Size and Page Margins.
•Scale: Adjust size by percentage of normal size or use the Fit To option.
Navigate
•Arrow Icons: Navigate quickly between the pages by using these options to go to the First Page, Previous Page, Next Page, or the Last Page.
•Navigation Pane: Allows users to search specific text in the reports or navigate through the document by pages or bookmarks. This pane can be pinned to the Report Preview window by click [Auto Hide] pin in the upper right-hand corner.
Zoom
•Zoom Out: Zooms out to see the document at a reduced size. Use (Ctrl+OemMinus) to shortcut this action on the keyboard.
•Zoom In: Zooms in to the see the document in a close-up view. Use (Ctrl+OemPlus) to shortcut this action on the keyboard.
•Zoom: Zoom directly to a specific percentage, or directly to the Whole Page or Page Width. (Ctrl+0) to go directly to whole page view (Ctrl+1) to go directly to Page Width view.
View
•Page Layout: Click the drop-down to select how many pages to show side-by-side.
•Enable Continuous Scrolling: Enable continuous scrolling between pages in a single or two pages view.
Export
•Export: Click the drop-down to export to a PDF, RTF, DOCX, XLSX, or Image File. Once the type is selected, choose the file path and adjust additional options before clicking [OK] to export the document.
•Send: Click the drop-down to email a PDF, RTF, DOCX, XLSX, or Image File. Once the file type is selected, choose the file and from additional options before clicking [OK]. The users default email will open up with the image type already attached and ready to be sent.
Report Data (Dates)
This section only displays on reports where date filters are viable. Use the filters to select a specific date range for the report displayed.
Reports opened from Report Center gives users additional options that are only available in reporting from Report Center.
•Memorize Report: Choose this option to add this saved report settings to the Memorized Reports in Report Center. Define a Report Name, Report Description, and choose an existing group or un-group it. Click the save option once a Report Name has been defined and ready to be saved.
Note: Report Name is the only required field in this window. Use the  [Add New] option at the bottom of the drop-down window to add an additional group to select.

Example of a blank Add Memorized Report window
Customize: Brings up a report settings window that allows users to save changes to the Display, Filters, and Include options in the report.
•Display: Change the Report Title and Report Description.
•Filters: Allows users to select specific date to filter the report. Each report will have a different set of filters that are available. Use the drop-down boxes to select the options to filter the report. Check the boxes  for the data to be filtered.
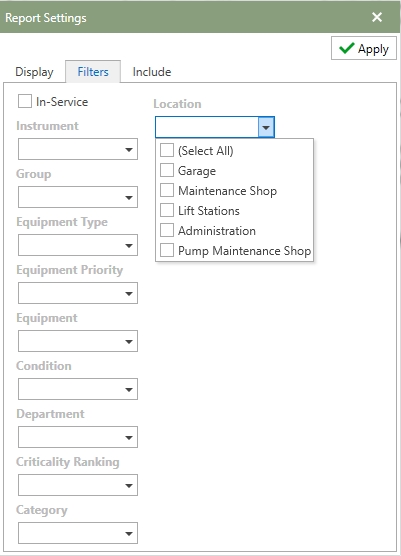
Example: The example of the filters page in the image above is for the Equipment Report and the available filter options that are specific to that report. Each report will have a different set of filters based on the report that has been selected.
•Include: Lists available data on the report with [Selection Box] by each one to check to include that data in the report. Un-check the box to remove the data from the report. The report will automatically adjust without the fields that have been left unchecked.

Example: The example of the Include Filter in the image above is for the Equipment Report and the available include options specific to that report. Each report will have a different set of include options based on the report that has been selected.
Open In Viewer/Open In History
Sections that require additional security will display information in a Print Preview. The ability to access Work Order and Procedure Viewer is permission based, and can be accessed by selecting the Open in Viewer icon. In addition to Open in Viewer, the option to Open in History will appear for sections referring to Work History. Listed below, are the sections where the hyperlink opens to a Print Preview window:
•Work Requests (Open Work Orders)
•Work Templates (Open Work Orders)
•Work Templates (Last Completed Work)
•Equipment (Active Work) *Work orders and Procedures
•Equipment (Work History) *Work orders and Procedures
•Parts (Work History)
Note: To be able to Open In Viewer, the user has to have access to Work Manager, All Work privilege, or be assigned to the Work Order or in the Maintenance Group. For Open in History, the user needs to be assigned user work, All Work privilege or access to the History section.