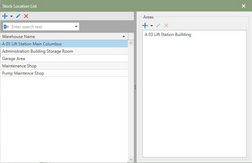
Users can associate parts with a Warehouse and area where the parts are actually managed. Each Warehouse has its own list of Areas in which the part can be further assigned to. Both of these lists can be added to, edited, and deleted when neccessary.
Adding Stock Locations
To add a Warehouse, click the  [add] button and define a Warehouse name. In the Area section, click the
  [add] button to add an Area to the new Warehouse. Both of the add button have the options to add similar by clicking the drop-down next to the
  .
.
Note: Each Warehouse has its own list of Areas that must be created.
Editing Stock Locations
To edit a Warehouse or Area, click the  [edit] button on a Warehouse or Area name to change the names.
Deleting Locations
Warehouse:
Click the  [delete] button in the Warehouse list to delete a Warehouse.
Warning: Deleting a Warehouse will delete all of the associated Areas, as well as any part stock quantities associated with that Warehouse. A confirmation window will be required before completing the delete.
Areas:
Clicking the  [delete] in the Area list will delete an area from the Warehouse.
Warning: Deleting an Area will also delete the associated part stocks that are at that Warehouse/Area. The Part stocks will be listed in the confirmation window.
